Clicking nails on the floor, a torn blanket, and a gait that makes your pet walk as if on high heels - this is no longer about aesthetics. It is a signal that comfort and joint health matter. The good news is that nail trimming can be a painless routine if you do it gradually and carefully, removing only what is necessary.
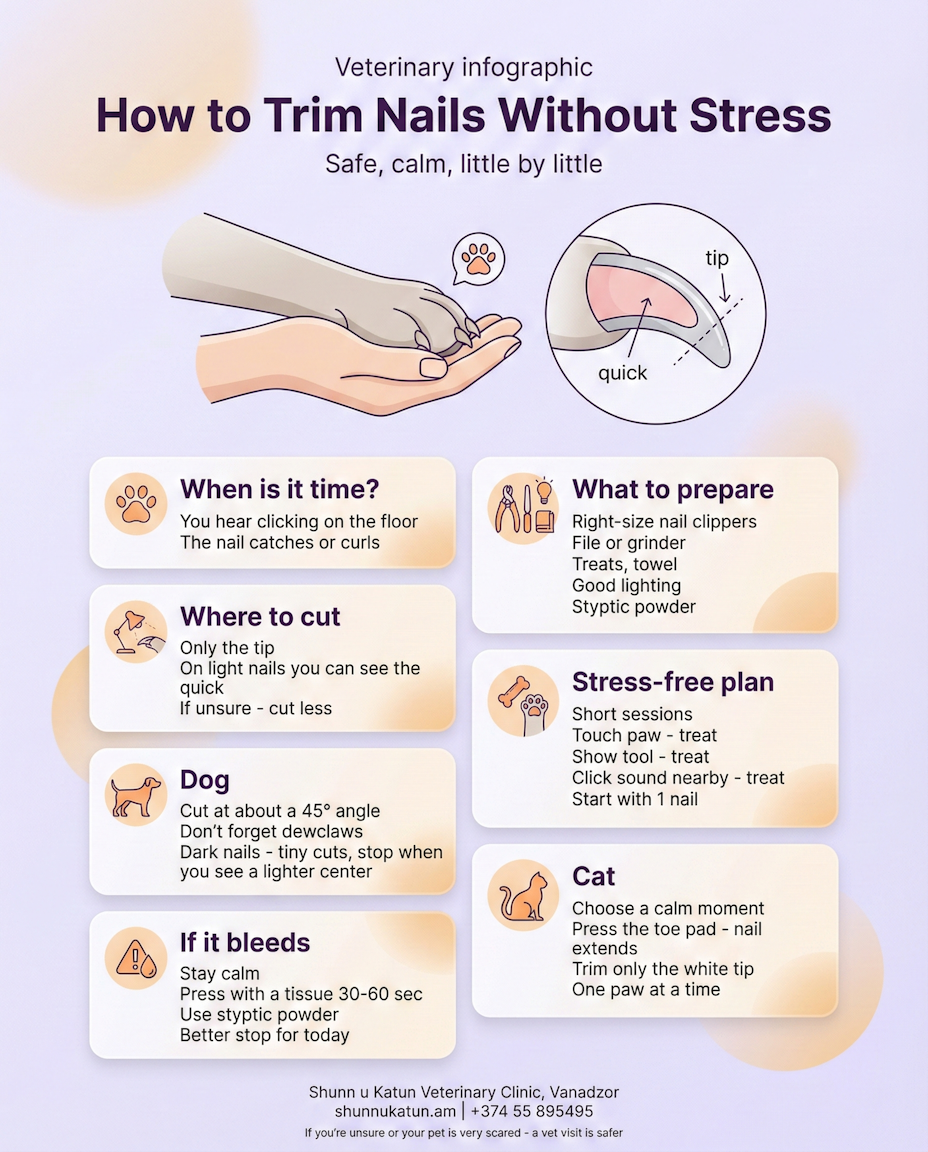
Why trim nails at all?
Long nails in dogs change paw placement, reduce traction, and eventually overload the joints.
In cats, overgrown nails can catch on fabric, break, dig into the paw pads, and also get in the way of normal grooming and play.
Active pets that walk a lot on rough surfaces may wear their nails down naturally. However, many indoor animals do not. The main cues are regular "click-click" sounds on the floor or a nail that is visibly starting to curl.
What should You prepare?
You do not need a groomer’s toolkit. You need properly sized nail clippers (for cats and small dogs - small scissor-style clippers; for larger dogs - heavy-duty clippers), a file or a nail grinder to smooth the edge, treats, a towel, cotton pads or wipes, a styptic product (powder or, in a pinch, potassium permanganate), and good lighting.
Where to cut?
Inside the nail there is a "living" part - blood vessels and a nerve (the quick). On light-colored nails it is usually visible as a pink area.
Cut only the tip. If You are unsure - cut less. Your goal is not "as short as possible", but safe and consistent. When nails are trimmed a little and often, the quick gradually recedes, and maintaining a healthy length becomes easier.
With dogs, it is usually more convenient to hold the clippers at a slight angle (about 45°) and cut from underneath upward, keeping the natural nail shape. Do not forget the dewclaws (on the inner side of the leg) - they do not wear down and grow faster.
How to make it stress-free?
The most common reason for a "meltdown" is not the clippers, but a sudden change of situation.
From your pet’s perspective, it looks like: their paw is held, a strange tool makes a clicking sound, and there is no way to leave. That is why our approach is built on short sessions and predictability.
An ideal scenario looks like this: first, teach your pet that having their paw touched is safe. For several days, touch the paw for a second, let go, and give a treat. Then introduce the tool without trimming. Next, add the clicking sound (make it nearby) and reward again. When your pet stays calm, trim a tiny sliver off one nail. Only one.
If your pet starts pulling the paw away, freezes, growls, their pupils widen, or the tail twitches - this is not "attitude". It is their way of saying "enough". In that case, it is better to pause and continue another day.
Your task is to build a calm association through gentle handling and treats: nail trimming is not scary.
Step-by-step: dog
Seat your dog so it is comfortable and safe for You.
Small dogs are often easier on your lap, larger dogs - on the floor with a helper.
Hold the paw, support the pad with your thumb, and stabilize the toe with your other hand.
Trim the very tip of the nail.
On light nails, do not enter the pink area. On dark nails, make tiny cuts and check the cut surface each time: when a lighter center or a noticeable "dot" appears, You are close - stop on that nail.
After trimming, you can lightly smooth the edge with a file or a grinder.
If You use a grinder, work in short touches - the nail can heat up.
Step-by-step: cat
It is best to choose a moment when your cat is calm or sleepy.
Sit the cat on your lap sideways and hold the paw with one hand.
Press the toe pad - the claw will extend.
Trim only the sharp, curved tip, the white part.
It is easy to get carried away with cat claws, but here it is the opposite: the smaller the cut, the calmer the next session will be.
Do one paw at a time. For many cats, this is easier than trying to "finish everything" in one go.
If You hit the quick and it bleeds
First - do not panic. Your pet reads Your reaction faster than You can say "oops".
Press a wipe or tissue to the nail tip for 30-60 seconds. Then apply styptic powder. If you do not have it, potassium permanganate may help in some cases.
After that, it is better to stop for today. Even if the bleeding stops quickly, psychologically this becomes a "bad take".
If the bleeding does not stop for several minutes, the nail is badly broken, your pet is clearly in pain, or you suspect clotting problems - do not try to tough it out, and show your pet to a veterinarian.
Common mistakes
The most common one is trying to cut "perfectly" in one session.
The second is trimming when your pet is already overstimulated (after an intense walk, excitement, or when guests are around).
The third is hard restraint by force. It may work today, but it almost guarantees a war tomorrow.
Another mistake is forgetting dewclaws in dogs and ignoring that cats’ back claws often wear differently.
And yes, a dull tool is a problem: it crushes and splits the nail.
When is it better to come to the clinic?
If your dog has dark nails and You are not sure where the safe zone ends.
If your pet is scared to the point of shaking, tries to bite, or struggles so hard that a joint can be injured.
If nails are already ingrown, paw pads are inflamed, there is chronic paw pain, arthritis, or the nail breaks repeatedly.
In these cases, it is faster and kinder to have the procedure done by a veterinarian or a groomer, and at home work on changing the pet’s attitude toward paw handling with small training steps.
Mini checklist before You start
Your pet is calm
Lighting is good
Treats are ready
The tool is sharp
A styptic product is within reach
You are not in a hurry
If even one item is missing - move it to another day. This is the adult wisdom here: better one nail today than ten hurts tomorrow.